How to render in Premiere Pro?
Adobe Premiere Pro is the perfect software for video editors who want to enhance their work. You can use this desktop application to transform any raw footage into brilliant video projects.
Premiere Pro provides you with countless tools that can help you refine your video and make it stand out. In this day and age, everyone creating video content realizes the importance of this app. With the help of Premiere Pro, you can create professional-looking results by fine-tuning the audio and adjusting colors.
However, when playing back video projects on Adobe Premiere Pro, people often notice a lag. It can be because some frames are skipped, or the transitions and effects might not work correctly.
If you are facing the same issues, your video project most likely requires rendering. People often avoid rendering as it is time-consuming, but it is essential to make your video project look high-quality and for full-speed playback.
[elementor-template id="3538"]
What is rendering?
Premiere Pro uses the assets you have stored in your folders for referencing, which helps in keeping the file size small and manageable. However, it can cause problems for the playback of the video project. When you add transitions, effects, or video clips to your project, Premiere Pro can playback the video for you to view.
When you render a project, it essentially means that Premiere makes and stores a preview for the project behind the scenes. And that is why, when you playback the video after you have rendered it, you get to view the project with all the effects, transitions, and clips you added.
If you add more effects or make any changes to the video, you will have to re-render the project so Premiere Pro can have an updated preview for it. Doing this enables the video to play back without any lag and at high speed.
What do the colors mean?
Premiere Pro will indicate it through colored bars at the top of the timeline when your project needs rendering. Different colors have different meanings.
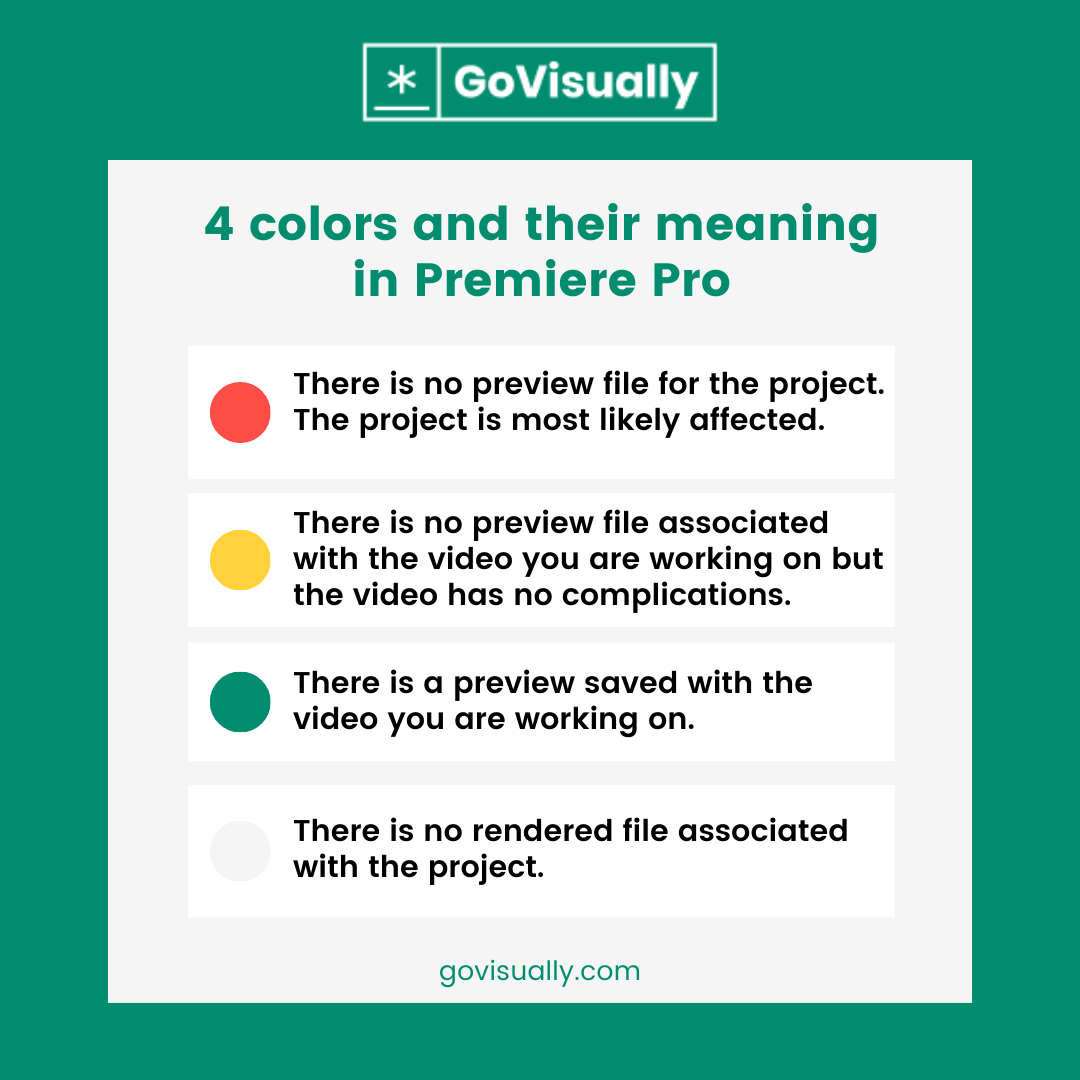
Red
If there is a red render bar at the top of the timeline, it tells you that there is no preview file for the project. However, the project is most likely affected, and some complications will lead to lagging during playback.
Yellow
A yellow render bar indicates that there is no preview file associated with the video you are working on. Premiere will render all the transitions, effects, and clips with a yellow bar before it reaches that point during playback. It also indicates that the video has no complications and it will play back with no issues.
Green
If there is a green bar at the top of your timeline, Premiere Pro has rendered the video. The green color means there is a preview stored and associated with the video you are working on. You will be able to playback your project without any lag or interruptions and at full speed.
No color
When there is no color bar at the top of your timeline, it means that there is no rendered file associated with the project. However, it also indicates that the media's codec is simple and can be used as a preview itself. There will be no issues with the playback.
How to render in Premiere Pro?
1. Define the work area
Before you start rendering your project, you have to select the area you will be working on. You can skip this step if you want to render the entire project. However, if there is a specific area you are working on, you need to define it. You must begin the practice of rendering sections as you go instead of doing the entire project at once.
To define the section you will be rendering, you have to place the player head at the start of the clip and press I on your keyboard to mark the in point. To mark the out point, you have to set the player head at the end of the section and press O.
Once you have marked the in and out points, you will see highlighted the section you selected. After the clip is highlighted, you can quickly move the markers to change the area you have defined.
2. Render a preview file by selecting the area
After you have selected the area you want to render, you can find the options for rendering in the Sequence menu at the top. You have three different options to render in Premiere Pro:
Render effects in to out
If there are any red bars on the top of your timeline, you should use this option. It is designed to look for transitions and effects that are causing your project to lag. To use this option, you can also press Return on your keyboard after selecting the area.
Render in to out
Using this option, you can render all the elements inside the area you have selected with a yellow or red bar. This option is excellent for general rendering, but you should avoid it for large projects as it can be time-consuming.
Render audio
As the name suggests, this option is just for rendering the audio in the area you have selected. This option is the best choice if your project uses music tracks or sound effects. However, the video footage should be simple for it to work perfectly. Premiere Pro does not render the audio automatically when you render the video, and it must be done separately. You can change these default settings in the preferences window in the app.
Rendering in Premiere Pro: tips and tricks
Rendering video projects can help you deliver excellent final results. There are a lot of tips that can help you improve the process and make your video project stand out.
Let's have a look at some of the most helpful tips for effective rendering.
- To help increase the speed of your editing system and Premiere Pro, you should use a Solid State Drive (SSD) to store your more significant editing projects.
- Always ensure that you use the correct graphics card and have enough RAM to achieve the fastest rendering speed.
- When you cancel the rendering process, you have to keep in mind that Premiere Pro renders the project in blocks, and all the previews created before you canceled will be retained. You can cancel rendering at any time from the progress bar.
- Premiere Pro renders and compresses your video project when you export it. To save time during the export after you have rendered the project, you should select the Use Previews checkbox. By doing this, Premiere will use the previews already available instead of rendering the video from scratch.
- Rendering your project while you are working on it can help you save time with the exporting process.
Key takeaway
Even though it may seem like rendering is a process that takes a lot of time, if you get into the habit of doing it regularly, you will be able to save time after you have finished the project. It also helps you avoid the frustration of lagging playback and low quality.
Just like everyone is used to saving their project from time to time, you should also make it a habit to render it. Use the render option in Premiere Pro to deliver excellent video projects with fast playback.
[elementor-template id="9369"]