
What is a dieline? Packaging dielines explained, with 19 free dieline templates
The flat template behind every box, label and pouch: what each line means, the common box styles, and how to make one for free.
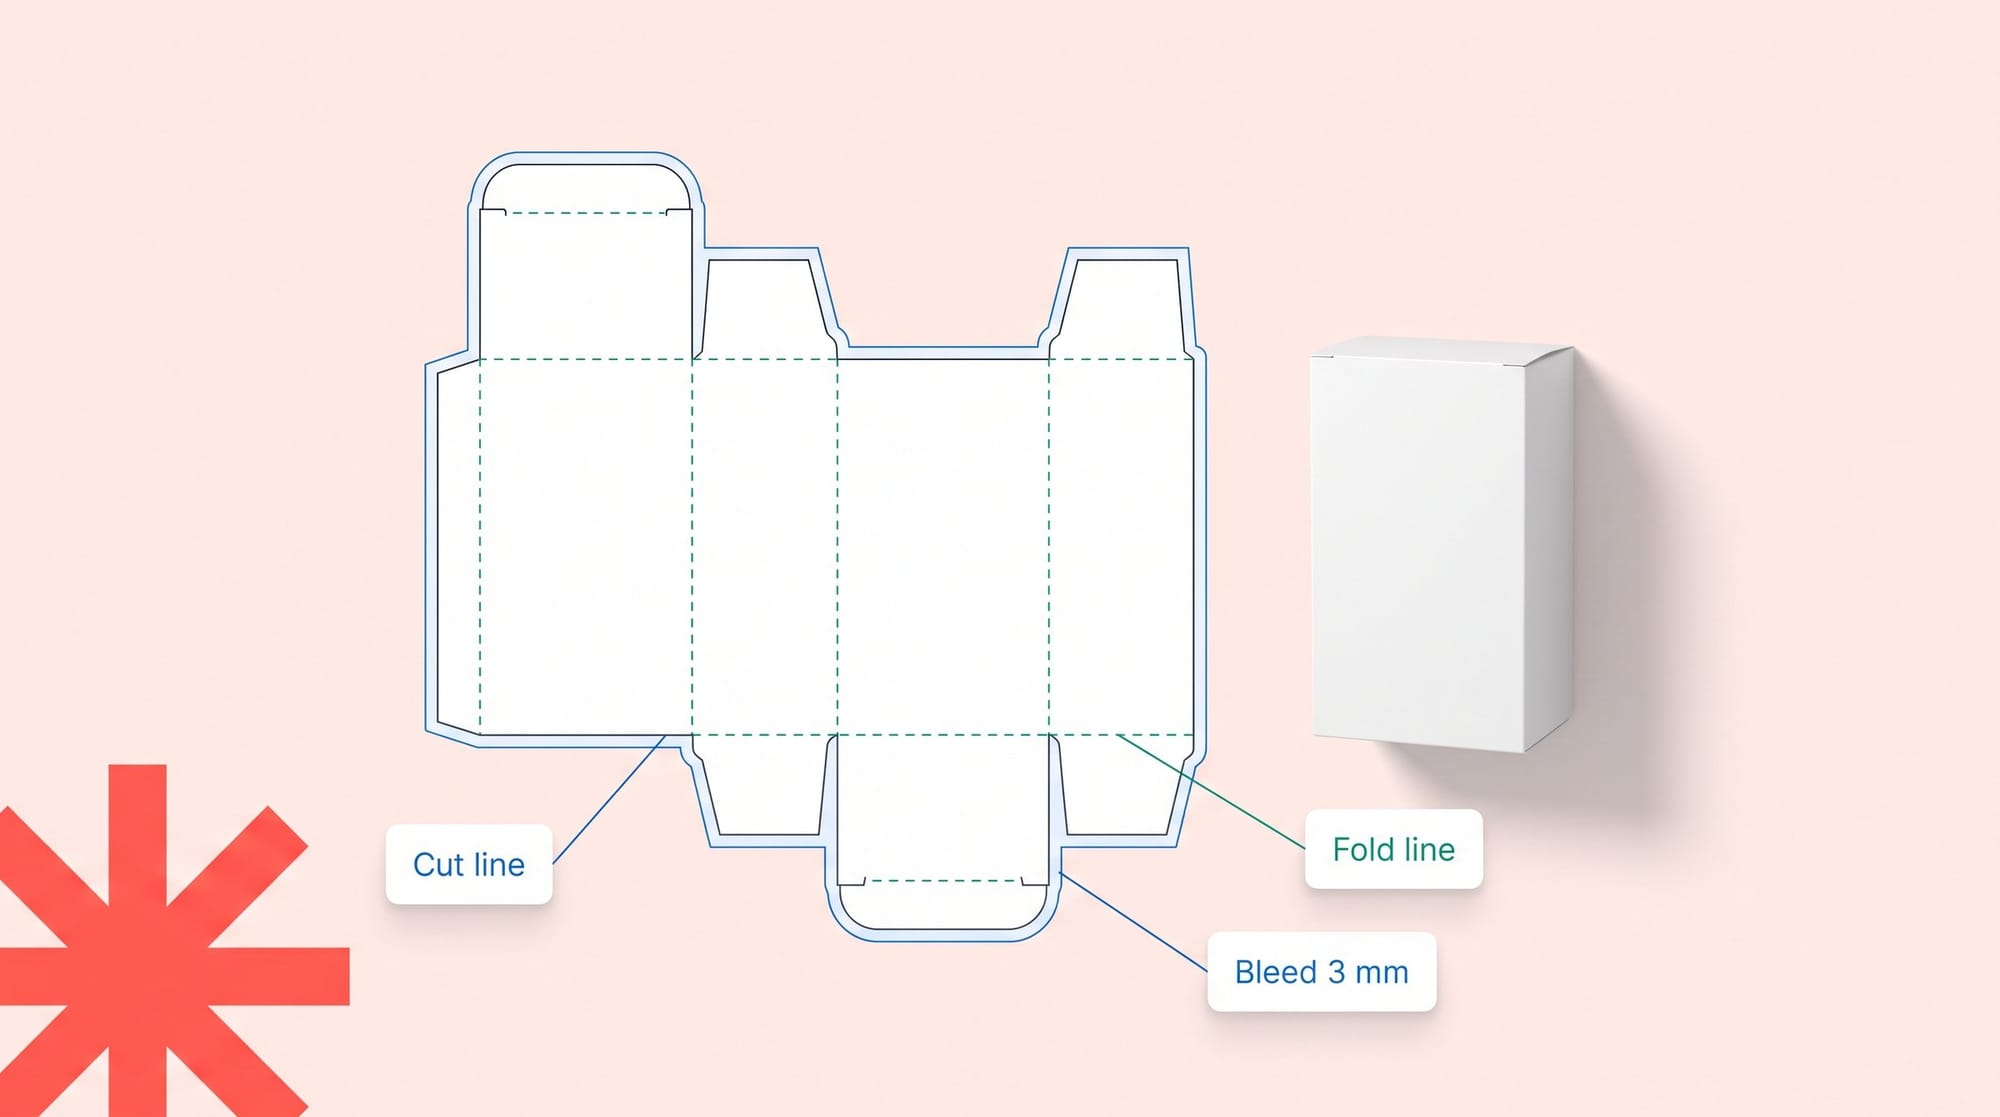
A dieline is the flat, unfolded template of a package. It shows where the printer cuts, where the board folds or creases, where glue goes, how far the artwork bleeds past the cut, and the safe area where text must stay. Designers build the artwork on it. Converters make the cutting die from it.
Every box, carton, label and pouch starts as a dieline. Get it right and the pack folds cleanly, with the logo centred on the front. Get it wrong and you find out on press: a barcode wraps round a corner, a claim sits on the glue tab, or the carton is 2 mm too small for the bottle.
This guide explains each part of a dieline, shows the common box styles side by side, and walks through making one. Every template mentioned here is free to try in our dieline generator.
The parts of a dieline
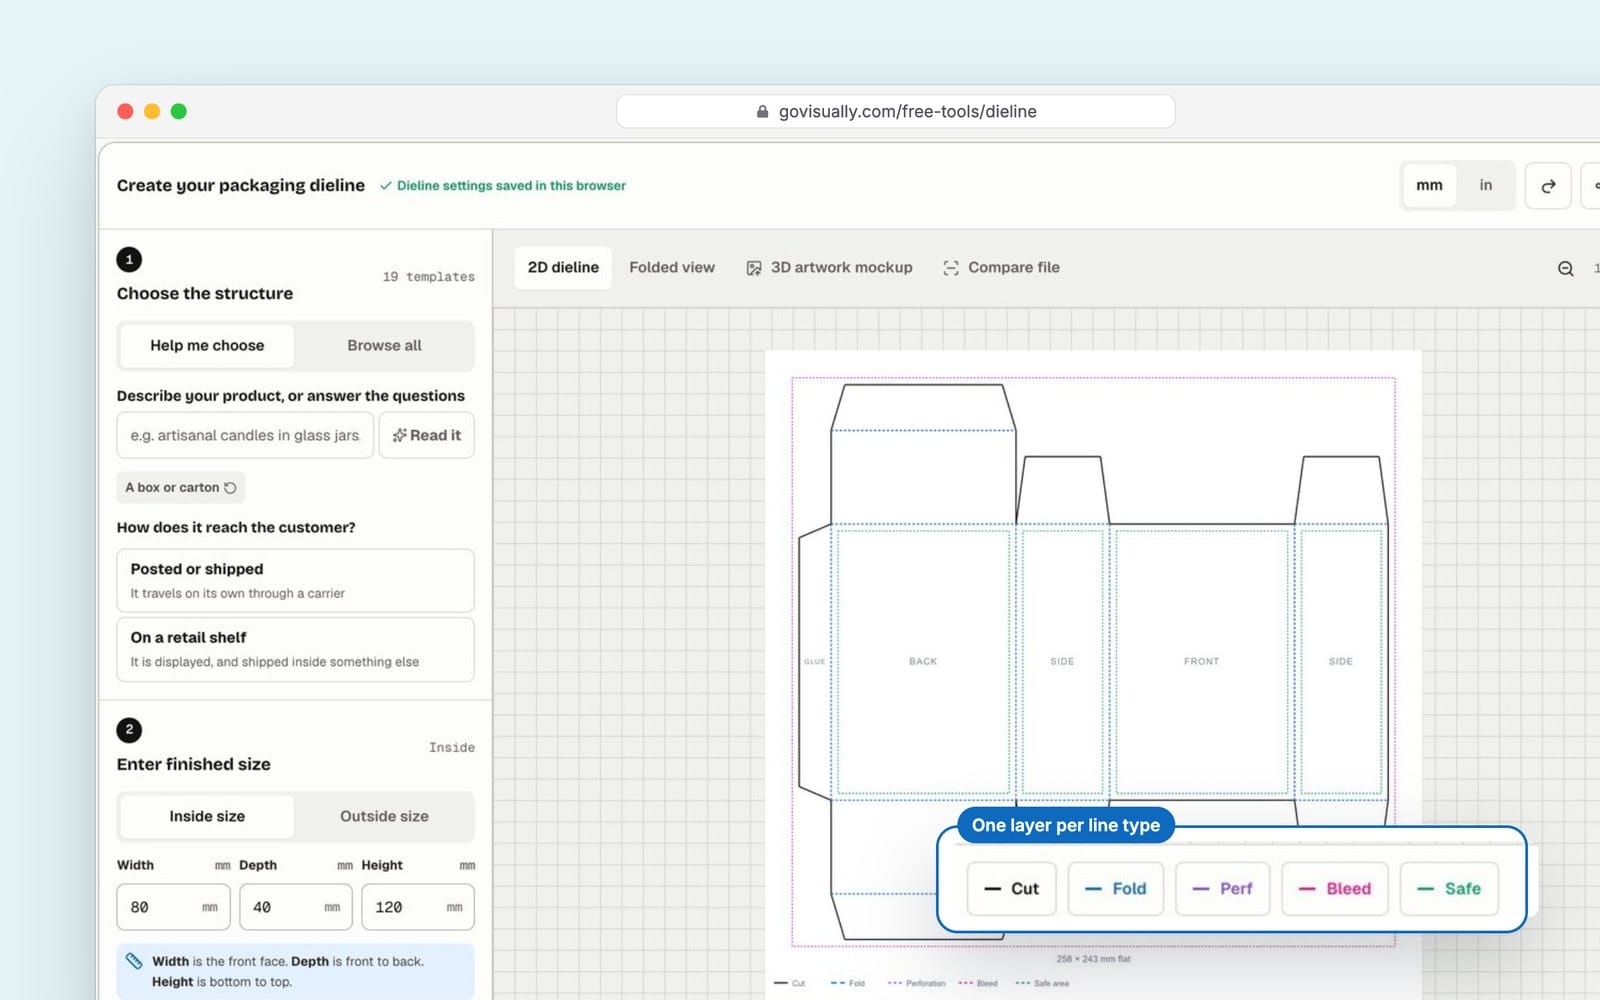
A dieline uses different line styles so the designer, printer and converter all read it the same way. Here's a straight tuck end carton laid flat, with each part marked.
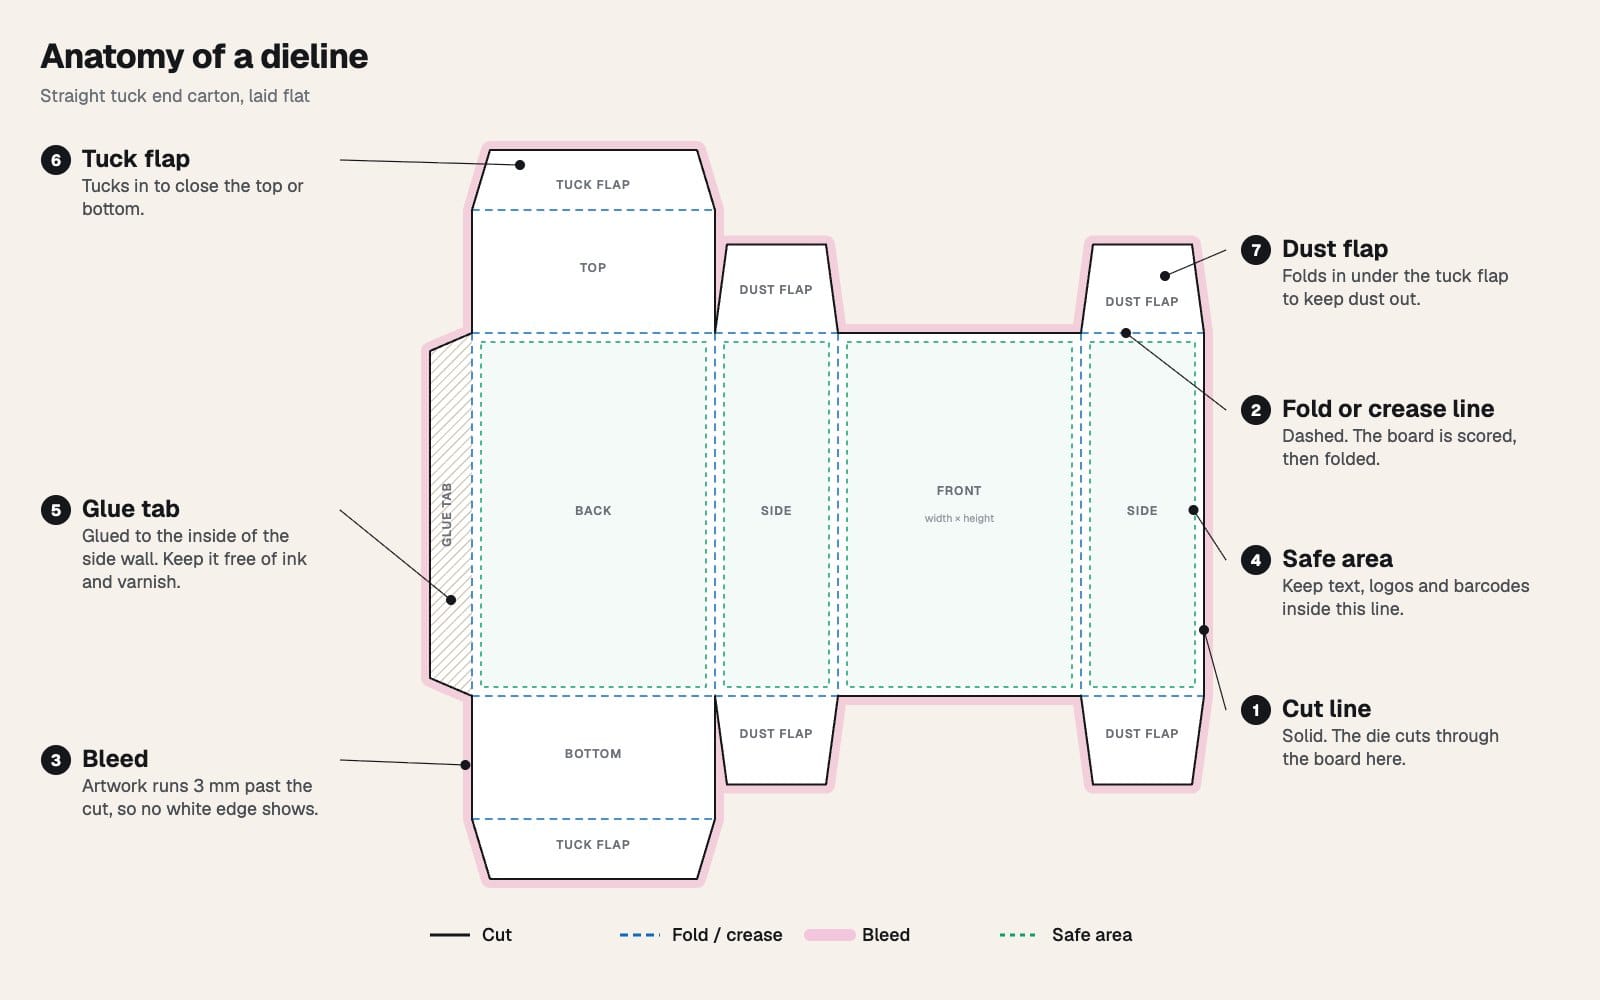
- Cut line. A solid line. The steel rule in the die cuts right through the board here. This is the outer edge of the finished pack.
- Fold or crease line. A dashed line. The die presses a crease into the board so it folds cleanly. Nothing is cut.
- Bleed. Artwork that runs past the cut line, usually 3 mm (about 1/8 inch). The die can shift slightly on press. Bleed makes sure no thin white edge shows.
- Safe area. A line inside each panel, often 3 mm or more in from the cut and fold lines. Keep text, logos, barcodes and required label copy inside it.
- Glue tab. The narrow flap that's glued to the inside of a wall to close the tube. Keep it free of ink and varnish, or the glue may not hold.
- Tuck flap. The flap that slides into the box to close the top or bottom.
- Dust flap. The small side flaps that fold in under the tuck flap. They keep the pack square and keep dust out.
Some dielines also show perforation lines (a cut-and-tie line for tear strips and easy-open tabs), panel names (front, back, side) and the flat size of the whole blank.
Dieline line types at a glance
| Line | How it's usually drawn | What the die does | What it means for your artwork |
|---|---|---|---|
| Cut | Solid line | Cuts through the board | Extend the background past it into the bleed |
| Fold or crease | Dashed line | Presses a crease | Keep fine text and barcodes off it |
| Perforation | Dotted or dash-dot line | Cuts in short sections | Avoid key copy across a tear line |
| Bleed | Outer guide line | Nothing; it's a print guide | Run colour and images to this line |
| Safe area | Inner guide line | Nothing; it's a print guide | Keep text, logos and barcodes inside it |
| Glue area | Marked or hatched panel | Nothing; glue goes here | Leave it free of ink and varnish |
Colours vary between printers. Many use a spot colour named "Dieline" or "Cut" so the lines show on proofs but never print. Always check your printer's legend before you place artwork.
Why the dieline matters more than it looks
A dieline is the one file that the brand, the designer, the printer and the converter all share. Small errors here cost real money:
- Wrong size. If you measured the outside of the product but entered it as the inside of the box, the product won't fit. Board thickness changes the numbers.
- Copy in the wrong place. A net weight or allergen line that crosses a fold can crack, wrap or disappear from the front view.
- No bleed. A thin white edge shows on every pack.
- Old dieline. The structure changed, but the designer worked on last year's file.
That last one is common. If you've ever wondered which dieline version the artwork was built on, you're not alone. Our list of packaging design mistakes to avoid covers a few more.
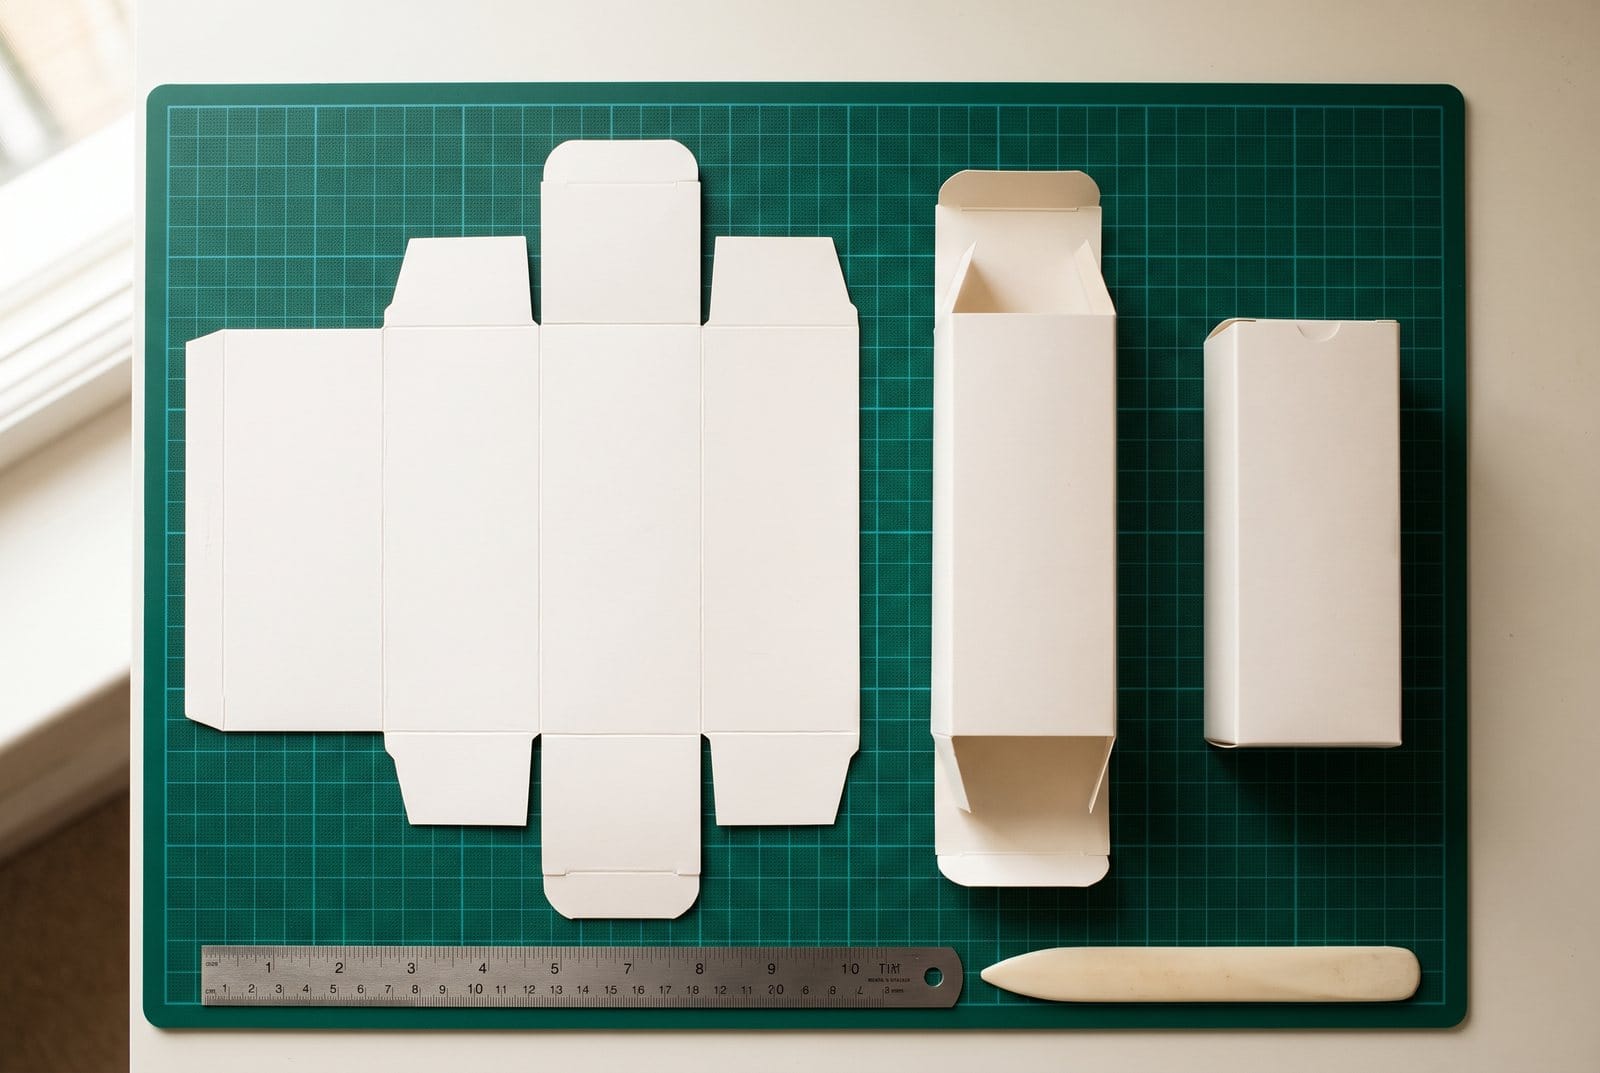
Common box styles and their dielines
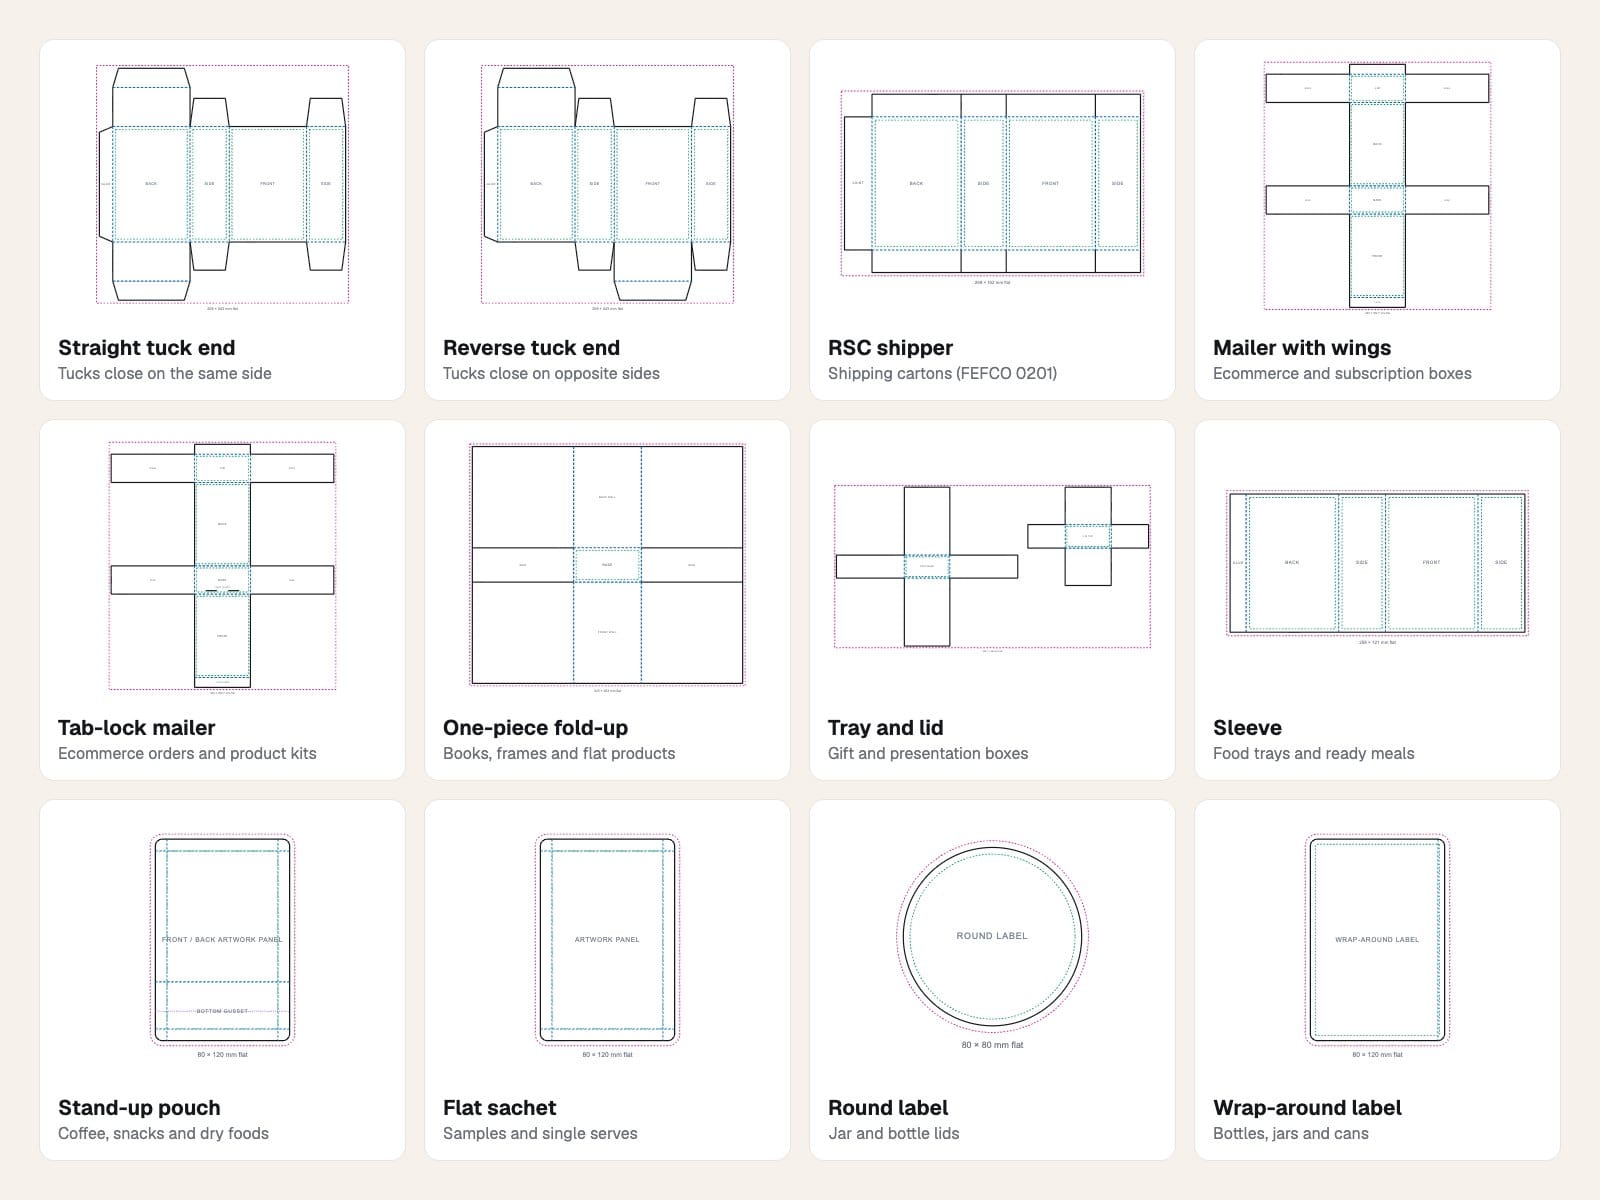
Box style is about two things: how the pack closes, and how it travels. A retail carton sits on a shelf. A shipper or mailer goes through the post. Here are 12 common styles, drawn by our dieline generator at its default sizes.
Folding cartons for the shelf
- Straight tuck end (STE). The top and bottom tuck flaps are on the same panel. It gives a clean front panel, so it's popular for supplements, cosmetics and premium cartons. Straight tuck carton dieline.
- Reverse tuck end (RTE). The top and bottom tucks are on opposite panels. Blanks nest more tightly on the sheet, so it often uses less board. Reverse tuck carton dieline.
- Sleeve. A band that wraps around a tray or box, open at both ends. Common on ready meals and multipacks. Product sleeve dieline.
- Tray and lid. Two pieces. It feels premium and suits gift sets. Tray and lid dieline.
Corrugated shippers and mailers
- Regular slotted container (RSC). The standard brown shipping box, FEFCO 0201. All four top and bottom flaps are the same length. RSC box dieline.
- Mailer box with wings. The e-commerce and subscription box that opens like a lid. Mailer box with wings dieline.
- Tab-lock mailer. A mailer that closes with locking tabs. Good for orders and product kits. Tab-lock mailer dieline.
- Other cases. Full overlap (FOL), half slotted (HSC), centre special slotted (CSSC) and multi-depth boxes cover heavy goods, display bins and orders of different heights.
Labels, pouches and tags
Flexible packs and labels have dielines too. They're simpler, but bleed and safe area matter just as much.
- Stand-up pouch. Front and back panels plus a bottom gusset that opens out so the pouch stands. Used for coffee, snacks and powders. Stand-up pouch dieline.
- Round label. For jar lids and bottle caps. Round label dieline.
- Wrap-around label. For bottles, cans and jars. Watch the overlap seam: nothing important should sit on it. Wrap-around label dieline.
- Rectangle and oval labels, hang tags and flat sachets. All in the same generator.
Which box style should you choose?
| If your product… | Start with | Why |
|---|---|---|
| Sits on a retail shelf and is light | Straight or reverse tuck end carton | Low cost, quick to fold, big front panel |
| Ships on its own to a customer | Mailer box with wings or tab-lock mailer | Strong, and opens like a gift |
| Ships in bulk to a store or warehouse | RSC (FEFCO 0201) | The standard, cheapest corrugated case |
| Comes in a tray or as a multipack | Sleeve | Uses little board and swaps easily for new flavours |
| Is a powder, snack or coffee | Stand-up pouch | Light, stands on shelf, room for a big front |
| Is a bottle or jar | Wrap-around or round label | Labels the container you already have |
Your converter has the final say. They know their board, their machines and what folds well at speed.
How to make a dieline in 5 steps
You can ask your printer for a dieline, draw one in Illustrator or CAD, or start from a template. Here's the template route with our free dieline generator.
- Choose the structure. Pick from 19 templates across cartons, mailers, corrugated cases, labels, hang tags, sachets and pouches. Not sure? Answer a few quick questions and it suggests one.
- Enter the finished size. Type width, depth and height in millimetres or inches. Choose inside size (the space for your product) or outside size (the finished box). Width is the front face, depth is front to back, and height is bottom to top.
- Set the production settings. Bleed, safe margin, stock thickness, glue tab and tuck flap depth. Defaults are 3 mm bleed and 3 mm safe margin.
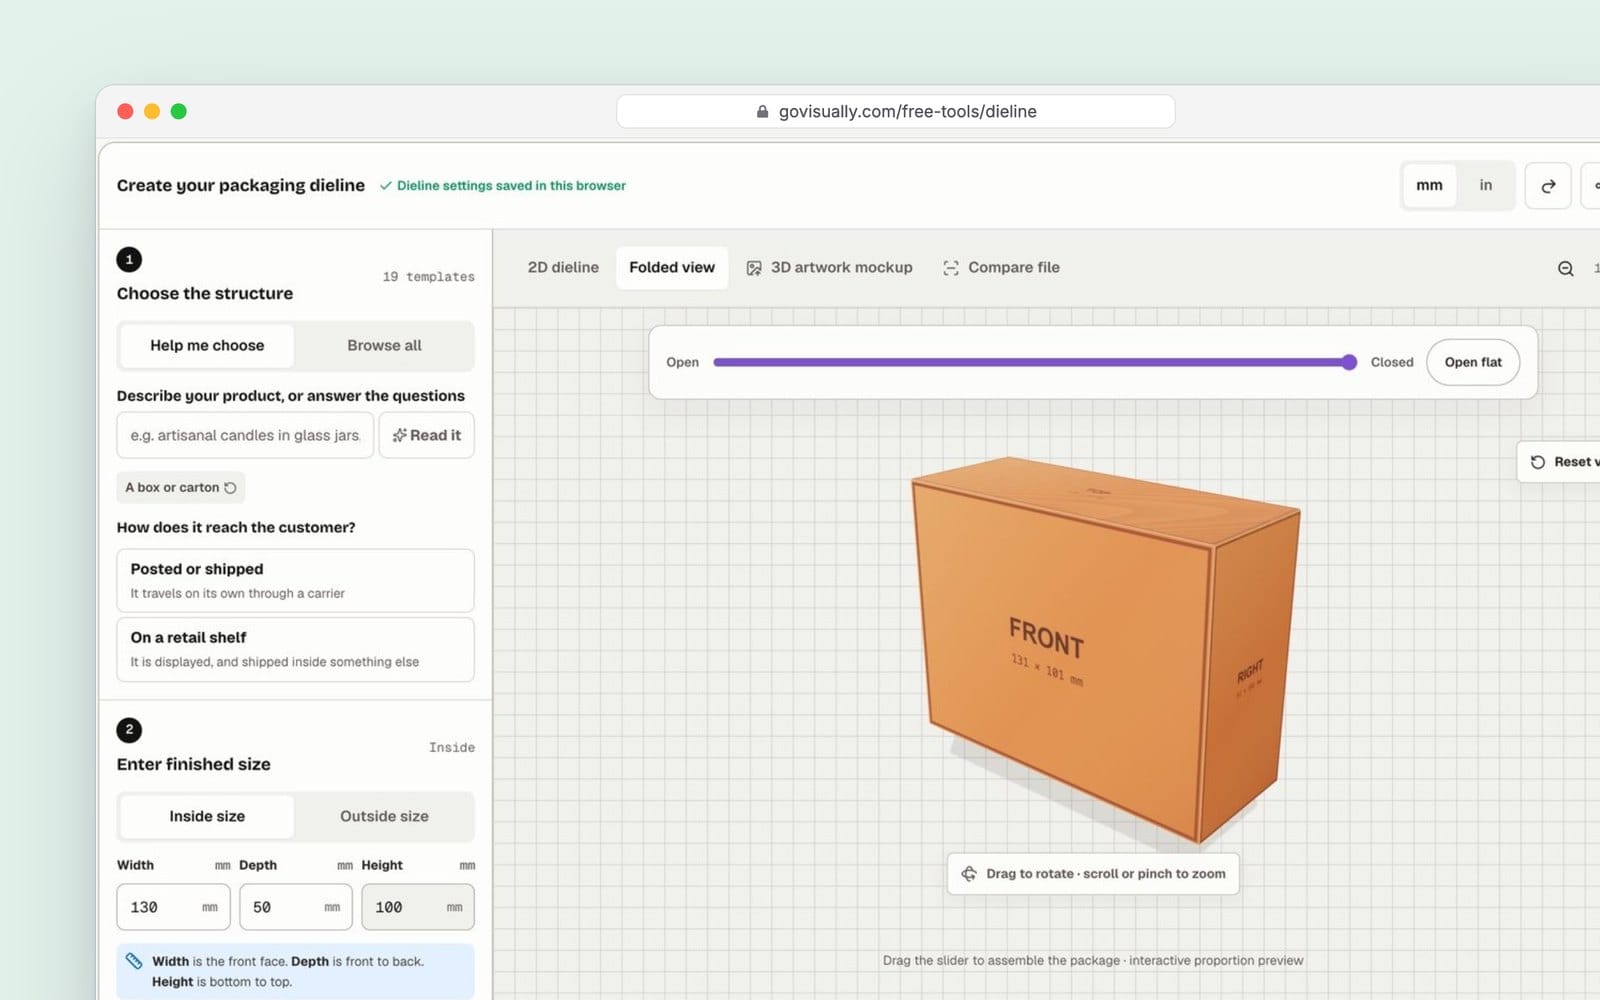
- Check it folded. Switch to the folded view or the 3D artwork mockup to see the shape before anyone cuts board. You can also overlay your printer's own SVG dieline to compare.
- Download and design. Export SVG, PDF, DXF or PNG at 1:1 scale, with cut, fold, perforation, bleed and safe area on separate named layers. You verify your email once to download in that browser.
A generated dieline is a strong starting file, not a final manufacturing die. Your printer or converter still needs to confirm board caliper, crease allowances, closures and tooling. Send it to them early.
Dieline checklist before you send artwork to print
- The dieline is the latest version from your printer or converter.
- Dimensions match the product, measured with the inside or outside size you meant.
- Background colour and images run to the bleed line on every edge.
- Text, logos and required label copy sit inside the safe area.
- Nothing important crosses a fold, a perforation or a label seam.
- The glue tab is free of ink and varnish.
- The barcode sits on a flat panel, away from folds, at a scannable size. Our barcode generator checks the check digit for you.
- Dieline lines are on their own layer, set to a spot colour, and set to not print.
- The final PDF passes a preflight for bleed, colour and fonts. Try the PDF pre-flight checker.
For more free tools across labels, nutrition panels and barcodes, see our guide to free packaging design tools for CPG teams.
Dieline FAQs
What is a dieline in packaging?
It's the flat template of a box, label or pouch. It shows the cut lines, fold lines, glue areas, bleed and safe area. Designers place artwork on it, and the converter uses it to make the cutting die.
Is it dieline or dyeline?
For packaging it's "dieline", from the die that cuts the board. You'll also see "die line" and "die-cut line". A "dyeline" is an old copying process for drawings, not a packaging term.
What's the difference between a dieline and a die?
The dieline is the drawing. The die is the physical tool, usually steel rules set in a board, that cuts and creases the packaging. The die is made from the dieline.
How much bleed does a dieline need?
3 mm (about 1/8 inch) is common for cartons and labels. Some printers ask for more on corrugated or flexible packs. Always use your printer's number.
What colour should dieline lines be?
There's no single standard. Most printers ask for a named spot colour, such as "Dieline" or "Cut", on its own layer and set to not print. Follow the legend in your printer's file.
Who makes the dieline, the designer or the printer?
Usually the printer or converter supplies it, because it must match their board and machines. Designers often start from a template to plan the layout early. Then they swap in the printer's final dieline before artwork is approved.
What file format should a dieline be?
Designers usually work with a vector PDF, Illustrator (.ai) or SVG. CAD and cutting tables often use DXF. Keep the dieline at 1:1 scale, as vector lines, on its own layer.
Once your artwork is on the dieline, get it approved in one place, with comments pinned to the panel they're about. See how GoVisually handles packaging artwork review.
Disclaimer: This article is general information, not legal or regulatory advice. Rules and product features change, and we can get things wrong. Check the current rules with the relevant regulator or a qualified adviser before you print. Last checked: November 2026.